This is a no holds barred deep dive into FL Studio 12 from the point of view of the desktop and the Surface Pro 3. Normally I post the written version on here just to highlight the video, but I thought I should do better and make the written version more complete with proper screen shots and the like. Besides when I make the videos I have to cut a lot out in order to keep the length under control. So here is the unedited and probably typo ridden full review that goes into far more detail than the video ever could. If you just want the video version then you’ll find it on our YouTube channel here: http://www.youtube.com/moltenmusictech
On with the article (it’s a long one).
I have looked down my nose, ignored, patronised and generally dismissed Fruity Loops as a fun little loop making program for its entire existence. I did hear of people using it, being creative with it but even when it evolved into FL Studio I didn’t take it particularly seriously. I was encouraged to check out version 11 because it had some multi-touch elements, but I soon discovered they were pretty basic and I had never liked the look of the program which appeared to have remained largely unchanged for a decade and so being a snobby knob I gave it less than a few minutes of my time.
So it is from a position of poorly disguised cynicism that I find myself looking once again upon the immense greyness of the latest version of Fruity Loops. However, I have a feeling in my water that cool stuff is going on in here and I will endeavour to put my prejudice aside and give FL Studio 12 a fair shake. Let’s see if I can get to the bottom of what’s great about this eager and strange piece of music production software.
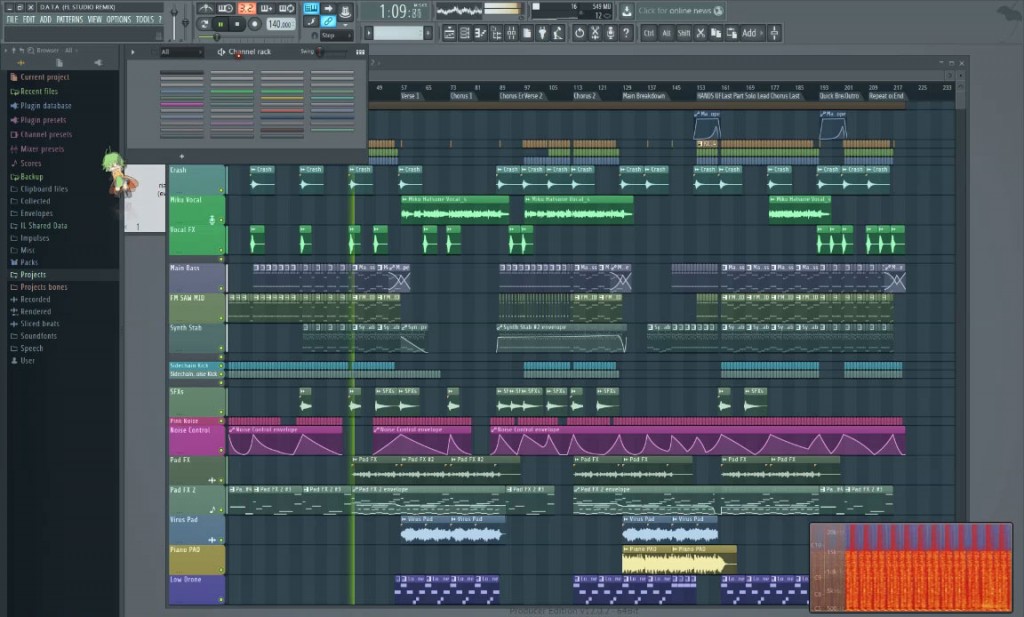
When you are used to practically any other DAW the layout of FL Studio is a bit disorientating and I find myself getting annoyed quite quickly. Simple things like why are the open/close/minimise buttons on the wrong side – why can’t I work out how to resize the main window – where’s the project/arrange window – what are all these empty browser folders – how do I actually do anything? The mouse pointer has turned into a little white dot and doesn’t appear to do anything in this huge field of grey, grey and more grey. So, remembering my promise to get deeper into it let’s open a demo project and see if I can get FL Studio to come to life.
File – Open presents some possibilities and I opt for the “Cool Stuff” folder and discover a huge list of projects. In most DAW’s you’re lucky to get one demo so this is very pleasing indeed. I opt for “D.A.T.A (FL Studio Remix)” for no particular reason and I’m treated to the same grey screen as before but this time I have a little pixie bobbing on the left and a text document of presumably Japanese lyrics. Hmmm….. ok, let’s press play. Ha – the pixie’s dancing! That’s hilarious. Right, so I’ve got some quite banging bit of techno going on but the only thing on screen other than the pixie who is going to have a heart attack soon is a cool looking spectrograph. Right Fruity Loops, time to show me what the fuck is going on.
Let’s have a go at the toolbar icons – first one is called “Playlist” – bugger me! Here we go. Right, familiar territory, a project/arrange style window called “Playlist” which is slightly weird but here we have MIDI tracks where you can see the note content and audio tracks with wave shapes and also what look like automation tracks. With the time line steaming along like it’s on fire the whole thing looks simply beautiful. Once you start fiddling and clicking around you find that piano roll editors leap and fly onto the screen, audio tracks have an unexpectedly serious looking editor, the mouse scroll wheel does awesome zoomy type things depending on whether you have Ctrl or Alt held down and shift seems to move events about. Just don’t right-click on anything or it will disappear. The other thing I notice is the massive smile on my face – could I actually be enjoying this? Let’s have a quick browse through these other buttons before we start learning how to use it.
Channel Rack – I have no idea what that is – it’s a box with little thin blocks on it that won’t go away.
Piano Roll – opens a blank piano roll but I can’t seem to select anything in the Playlist for it to edit.
Browser/Plugin Picker – opens and closes the side browser.
Mixer – Oh cool – there it is, nice one – oh look it’s grey.
Open Project/Plugin Picker – what the hell is this? It produces a window that smoothly fades in over the top of everything else and appears to have a bunch of clips and images of synths and stuff. Hovering my mouse seems to trigger them and also shows which clips are connected to which synths – I’m assuming. It’s stunning and fascinating and maybe I’ll come back here later.
Open Plugin/Plugin Picker – Wow, same sort of screen but this time it appears to show all the various plugins and synths available. Are these all included plugins? I can’t see any of my VST plugins so I guess they must be. What an awesome way to let you browse plug-ins – not sure yet how you use or select things but we’ll come onto that.
View Tempo Tapper – oh, a nice big place to tap the tempo – are you watching Propellerheads?
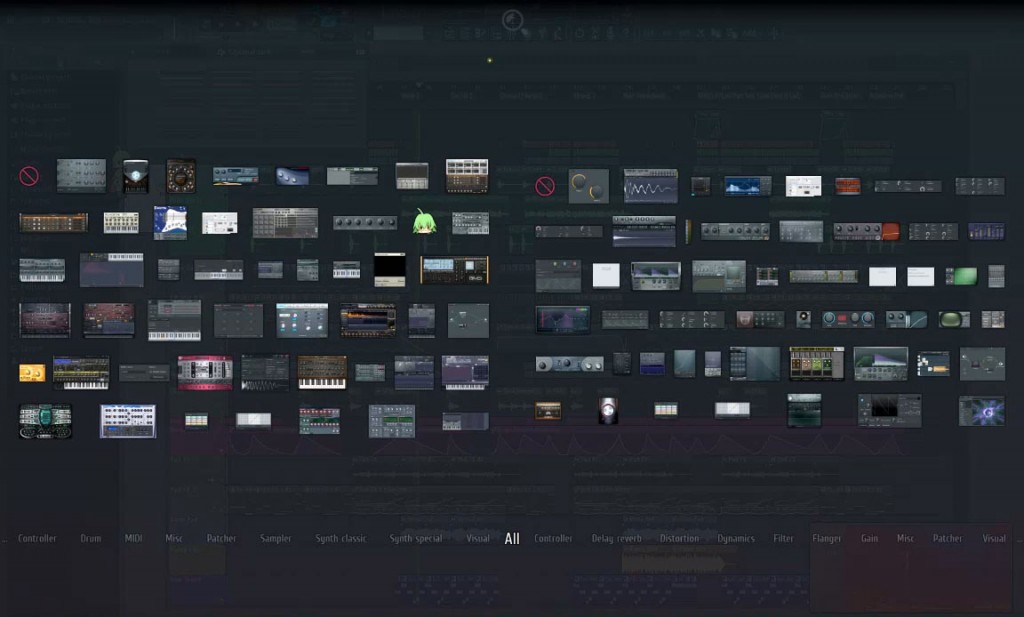
That seems to be the main toolbar but something tells me we’ve not yet scratched the surface. So my first impressions? Well, having gotten over the initial disorientation and the acres of greyness I’m feeling quite excited by what I might find in here. There’s a lot things I’m not yet understanding – like I have this list of plugins and stuff on the left that seem to want to be dragged into the Playlist but nothing happens. There’s also some quite busy menus and right-click options in certain places that need to be explored. So, rather than fumbling around I’m going to crack open the documentation and watch a few videos and come back and try to open up FL Studio 12 for you good people.
Getting into the Details.
Right – the first thing you have to do is unlearn everything you think you know about DAW software. The journey that this program has taken from Fruity Loops to FL Studio has resulted in a very unique and open way of working. The normal linear and logical connections of MIDI tracks, audio tracks and routing are simply not there and instead FL works on the fluid concept of that you can slap anything anywhere. The reason the playlist window has a billion tracks already setup is because these are not really tracks in the regular sense, it’s just a grid onto which you paint your stuff. They probably call them tracks so that it’s familiar to people coming to FL for the first time. The tracks have no relationship to the mixer – instead the mixer deals with the actual devices making the sound, whether MIDI or audio. And then the final thing to understand is that as these are not tracks you don’t really record into them, you record into patterns or clips and then slap those patterns into the playlist. I guess it’s the impression that the term “patterns” give that makes you assume this is all about dance and electronic music – which is probably true but also short sighted.
Let’s open a new project and get stuck in.
All you get with a new project is this box called the Channel Rack – you may get other things too like the mixer and playlist which largely depends on what you had open last time, but let’s focus on the Channel Rack. On it you get what looks like an analogue drum machine with four sounds – Kick, Clap, Hat and Snare, each with 16 step buttons which you can turn on and off with your left/right mouse buttons. In previous versions this window was called the “Sequencer” which initially makes a lot more sense but this has developed into much more than simply sequencing things. The Channel Rack is the beating heart of FL Studio, it’s where everything lives, it’s the home of every synth, sound and instrument – anything that produces or controls sound is present in the Channel Rack. It’s also the place where you make your music, where you create your sequences and put together patterns. In fact FL Studio could be just this window and you’d find it perfectly adequate at creating music – which is essentially what Fruity Loops used to be.
The key to unlocking what FL Studio is about is understanding how the Channel Rack relates to patterns. In the middle of the toolbar you’ll see a little display showing “Pattern 1”. In the Channel Rack create a quick sequence with our drum machine. Add in a different sequence and you’ve created a second pattern! You can swap between the patterns and the channel rack will change immediately to reflect that. FL likes to give you half a dozen ways of doing the same thing, it supports whatever work flow you want to use. You want to select patterns from a menu – no problem, try the Patterns menu; you want to click and select in a display – off you go; you want to change by rolling the mouse wheel – just put your mouse on the display; you want to do it via a right-click – bang, there it is. You can create as many patterns as you like and if you were to link them together into a song you would have discovered the very essence FL Studio.
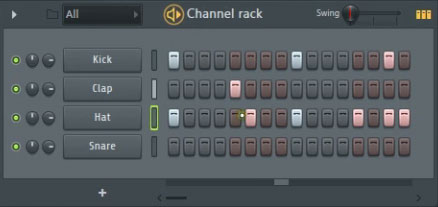
Obviously this is not all about a four sound drum machine. At the bottom of the Channel rack is a little + button, let’s click on that and see what we can add. FL Studio comes with a whole bunch of stuff – synths, samplers, utilities and weird things that either generates sound or routes it about. But of course this is not the only way of adding a new thing to the Channel Rack, oh no, you can also drag it in from the Plugin Browser, or right-click and insert it into a new channel; or hit the Plugin Picker tool and wham – thumbnails of all the plug-in’s GUI’s swoosh into view and you can choose it from there – but however you do it the plugin arrives smoothly, animated and ready to go.
Let’s choose the 3x Osc. This is a simple, 3 oscillator analogue synth with different wave shapes and beautifully animated knobs. You’ve got control over envelops and LFO’s, filter and effects – it has bugger all presets but it’s a good place to start (apparently the presets are in the browser under “channel presets” rather than under “presets” on the actual synth). Now we could enter some steps in and start creating a single note sequence but that doesn’t sound very fun and so for instruments what we need is a piano roll. Press F7, or the toolbar button, or under “view” or right-click and select “Piano Roll” and there we have a proper MIDI editor onto which we can draw or record notes. There’s a whole bunch of tools which we’ll get onto in a minute but as you add some notes you’ll notice that the step sequencer in the Channel rack has now changed to a piano roll overview. Hit the play button and what you’ve drawn has now become part of the pattern you’ve got selected. Now you may have painted notes it past the first bar and so now our 16 step loop doesn’t reach that far with the drums – in fact FL doesn’t really know how big you want the sequence so it simply defaults to looping at the end of the last bar that had something in. Dragging on the right edge of the Channel Rack reveals another 3 bars of 16 steps and as you add more and more to the piano roll the number of bars can keep expanding. As you add more synths and instruments to the Channel Rack you can add further notes to the selected pattern which can create multi-layered, multi-instrument patterns. Is this good? Maybe, but we really have to talk about the Playlist before we fully understand why we’re making these patterns and what we’re going to do with them.
The Playlist
What initially looks like a regular arrange window the Playlist is actually an open grid onto which you paint your patterns as clips.
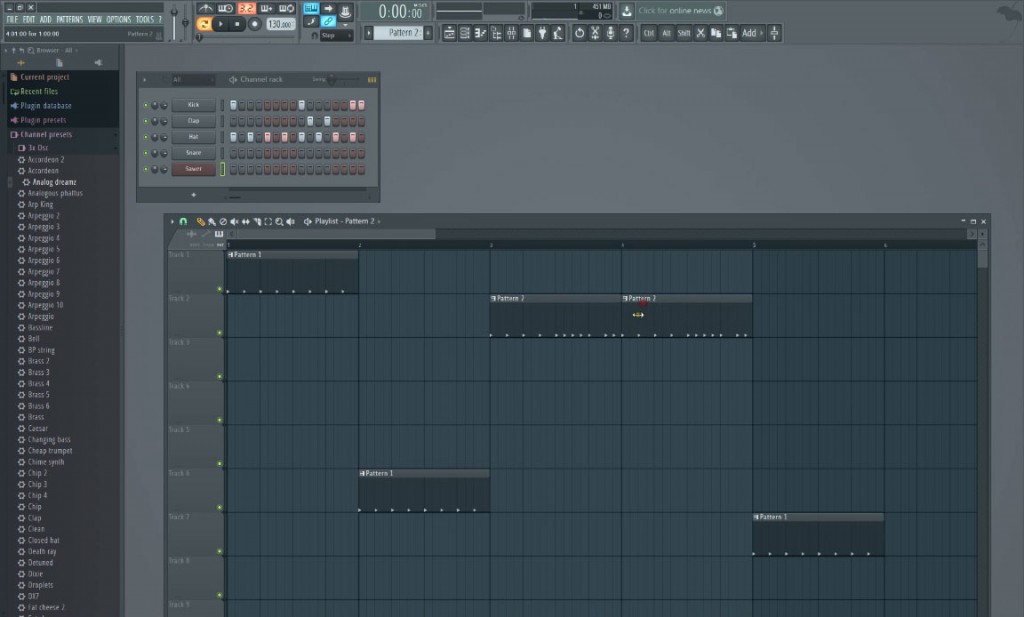
So let’s do something basic to demonstrate that. With my four original drum sounds I’ll create two 1-bar patterns. Now I’ll drop in the Sawer synth to create a bassline – select a suitable bass sound and draw or play in a bar of notes. When you press record you get a sort of helpful and yet confusing “Recording” window that asks very politely what you’d like to record. It seems to assume you’re recording audio and the options are to record:
“Audio into the Edison audio editor/recorder”
“Audio into the playlist as an audio clip”
“Automation & score”
“Everything”
“Show me some more help”
I’ll assume as we’re recording MIDI from a keyboard that “Automation & Score” is probably the best bet – and it is – but it’s really weird that there’s no “record MIDI” option and even weirder that they seem to call it “score” when there is certainly no scoring facility in FL Studio. Sadly the “Help” option takes you to the manual and talks only about recording audio rather than describing what these options mean.
Ok, I’ve recorded a bar of bass alongside the drums but of course that is now part of the same pattern as the drums – I didn’t really mean to do that. There’s a couple of things I can do – one option is to select “split by channel” under the “Patterns” menu which creates a separate pattern for each channel – but for this I’m going to right-click on the Sawer channel and select “Cut”, add a new pattern called “Bass” and then paste it in. I’ve now got two drum patterns and one bass pattern which I can play independently. But I don’t want to do that either – I want to play them together right? Right, so let’s open the Playlist and do that. So press the Playlist toolbar or select it from one of the 5 menus places and here we are – this is it. What you need to notice is what pattern is selected – this is in the display at the top but also it’s shown on the top of the Playlist and you can also select the pattern from there. Track numbers are irrelevant so select Pattern 1 and draw or paint some onto the grid. Select pattern 2 and stick a couple of those on as well. Same track or different track? Doesn’t matter – whatever seems right to you. If you hit play you’ll probably find that nothing seems to be happening in the Playlist but the selected pattern is playing – this is because there are two play modes, pattern mode and song mode. In pattern mode just the selected pattern plays and that’s indicated by the lit up loop button next to the play button. Deselect that button and you enter song mode where it plays what’s in the Playlist. Select song mode and try again – you’ll also find play buttons at the top of the Playlist and Channel Rack window which accomplishes the same thing. Now you’ve got your song position line scrolling across the Playlist and your patterns play as placed. You can create a looped section by right-clicking and dragging in the timeline at the top. While you’ve got your drum patterns playing select the Bass pattern and slap that on as well. It doesn’t matter which track you use – you can spread them around if you like but it’s probably simpler to keep them together. Right, let’s add another synth. The first mistake you tend to make is trying to drag a synth onto the Playlist – it looks like something happens but nothing actually does. You have to drag the plug-in into space or directly into the Channel Rack, or use the plug-in picker and then it loads into the Channel Rack ready to go. I’m going to select a nice pad sound and record it alongside for all four bars. Now if I try to record it onto another track like I would in Cubase or whatever then what actually happens is that it now forms part of the currently select pattern and seems restricted in size to the length of that pattern – in this case the bassline. What we actually want is to record some notes for our new instrument and to do that we need to create a new pattern with a piano roll and record into that. We can do this in pattern mode, hit record and off we go but we don’t get any playback from the other patterns and so find ourselves unaccompanied – this may be great in some circumstances but we want to record alongside the current song and so we need to do it in Song Mode. So instead, with the new “Pad” pattern selected we draw in an empty pattern in the Playlist where we want to start recording. The length of the pattern doesn’t matter as it’ll stretch to however long we play for – or the size of the looped selection. It looks like we’ve recorded into the playlist when in fact we’ve just created a new pattern which can them be drawn again onto the Playlist with the draw or paint tool. Do you see how things are starting to build up and how this works in terms of creating loops and patterns rather than linear recordings? Every time you record some notes you’re adding to your library of patterns which you arrange on the Playlist to create your song. And although it’s taken quite a bit of explaining to get here it’s actually devastatingly simple.
Playlist Tools
There seems to be a dizzying array of tools and editing options within the Playlist, but the main ones are available along the top. First you’ve got a little arrow which gives you access to everything in an old style list menu and next to that a snap menu. Then you have Draw which is left button place clip, right button delete. Paint tool let’s you add and remove more patterns by clicking and dragging. Next is a delete tool that you don’t really need and then a mute tool which is more useful. Next to that is a slip tool which is quite interesting – although doesn’t seem to get any love in the manual – you can use it to move the contents of the clip between the start and end point. So if you’ve resized the clip you can move the pattern notes forward and back within that clip. Next you have the slice tool represented by either a razor blade or a goose depending on your point of view. Click and drag vertically to cut through a clip. You can also click and drag at an angle to cut at some unspecified point along the drag – I don’t really understand this but if you angle drag across a load of notes you essentially get cuts all along that line, which is something I’ve not seen before. If you right-click instead of cutting it pulls the start or end point up to the slice depending on which is closer.
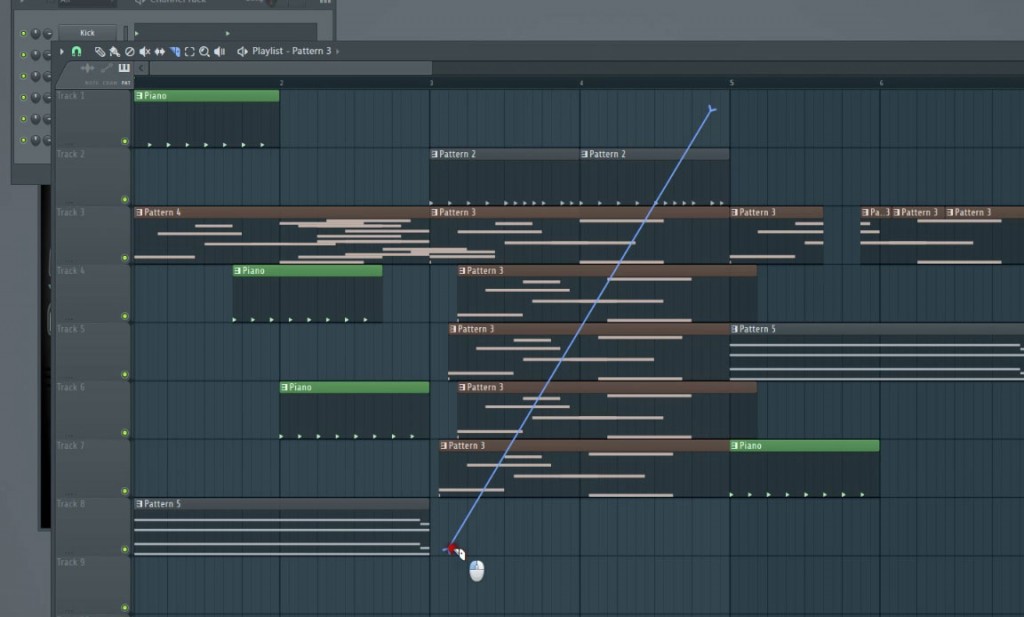
Finally you have a select tool, a zoom tool and a playback tool which is pretty cool – you click and hold it on a clip/pattern and only that part plays and loops – like a solo/play tool. So from the basic premise of throwing patterns onto a grid the Playlist gives an enormous amount of editing power in terms of size, shape and placement. If you want to edit any of the notes simply double click when in draw mode, or access the pattern piano roll via any of the usual methods. One thing to note is that each pattern remains constant – I’ve used “clip” and “pattern” a little bit interchangeably when in fact it’s a clip that you are drawing onto the Playlist and that clip contains the chosen pattern. So when you edit the clip the pattern remains unchanged – but when you edit the pattern those notes change inside every clip. This is awesome because you can edit one thing in one place and that edit appears in every instance in the song – but it’s also really annoying for exactly the same reasons. There’s a simple way to get around this – if you click on the top left corner of a clip you reveal yet another menu on which you’ll find “Make unique”. This automatically generates a new pattern with the currently selected clip so you can edit it and treat it independently – so easy!
One thing of note is that the draw tool always draws the last thing it touched – so you touch a clip with pattern 2 in it and your next click in space adds another pattern 2 clip without all that fussing around in menus. This gets interesting because it creates a super efficient way of copying edits. For instance you may want to create a build in the drums – you could create a bunch of patterns with smaller and smaller sizes and paste them all in – or like in other DAWs you could copy/paste a clip, make it smaller, copy/paste again and so on but in FL every time you resize a clip your next click produces an identical clip so you resize one (retaining the end of the pattern) and add another three very quickly, resize again, add three more and so on. This makes painting patterns and edits so damn fast and easy…. The right-click = delete thing though continues to drive me bonkers!
Automation
FL Studio loves automation – it gives it a lot of attention and detail and is treated with the same level of importance as clips themselves. Automation is the idea that you can write or record in changes to knobs and sliders over time. Automating parameters is slightly easier in FL’s own instruments so we’ll start there and come onto automating VSTi’s in a minute. Pretty much every knob, slider and control in FL can be automated and of course there’s a dozen ways of doing it but the simplest is to right-click the control you want to automate and select “Create automation clip” from the menu. This slaps a nicely labelled automation clip into the Playlist complete with a line set to the current value. It also inserts an entry into the Channel Rack. This implies that you can add automation to patterns, which you can, sort of, except it tries to do it with the sequencer steps or piano which makes no sense so we’ll ignore that can concentrate on the Playlist.
So, load up something like Harmless, create a simple pattern and paste it into the Playlist. Right-click on the nice big “freq” filter knob and select “Create automation clip”. You can now start playing with the line and delight yourself with the control of the filter cut-off. The control over that line is quite impressive. You have two points, left and right (or beginning and end) and a node in the middle which allows you to adjust the line. To start off with it gives you a nice curve but if you right-click the end point you can choose all sorts of lines from a list – single curve, double curve, stairs, pulse, wave etc and each of them has a load of scope. One thing you don’t have is a straight line option but if you right-click the middle node it always returns to the straight line. If all these automatic curves are bit too restrictive for you then if you click the worlds smallest button at the top left of the Playlist called “STEP” then you can draw your own automation in freehand guided by the current snap. Then you can draw further curves in between each newly created point to an unfathomable depth. There’s similarly small button next to it called “SLIDE” which allows you to push all the automation from the point you’ve grabbed to the right, extending as it goes. There are probably modifier keys that swap all these tools around because clicking those little buttons is really annoying.
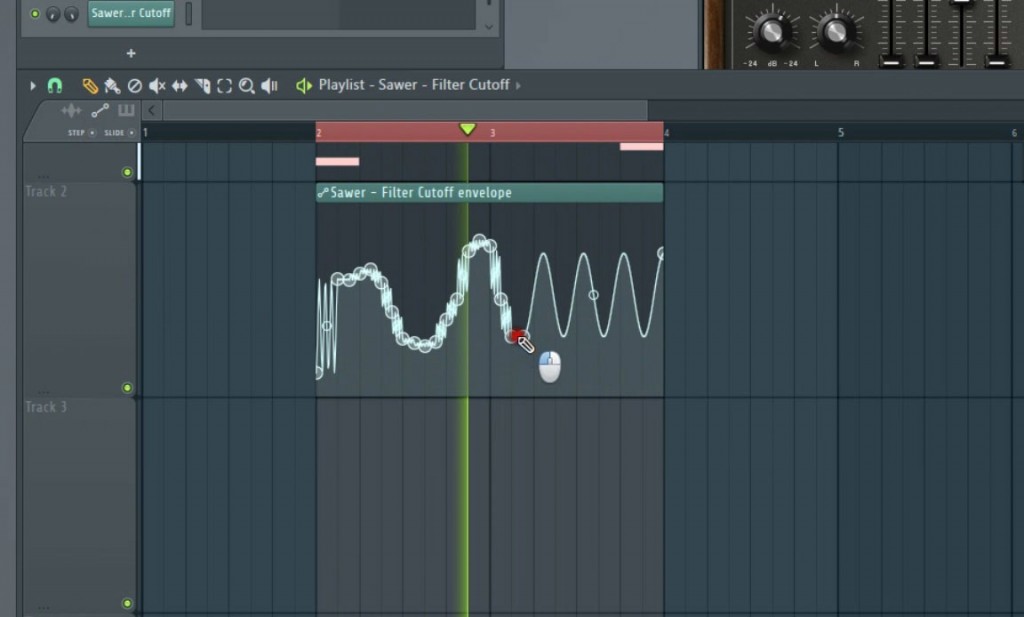
The automation clips in the Playlist only affect the synth during song mode playback, not during pattern mode and of course they don’t relate to the patterns, they relate to the timeline and the synth. They can be painted and moved about just like clips and you can also create unique copies from the top-left menu just like clips. But that’s not all – the automation clips can also be automated. If you double-click the top of the clip you’ve bring up the clips editor which includes an LFO. Turn it on and you get a nice wave shape with a few cool controls. Now right-click the speed knob and create another automation lane – you now have automation control over the speed of that LFO – that’s awesome! And the way the display updates is fantastic – I love it. But that’s still not all – you can also add automation over the top of the LFO to do really weird stuff. Is that it? Not quite – you can also tie controllers together into the same automation clip by right-clicking on another parameter, selecting “Link to controller” and then selecting the automation clip from the drop down menu. It’s wonderfully bonkers what you can do in here.
Included Instruments
There are 23 included synths (varies depending on the version you’re buying) taking in all forms of synthesis and sound generation – there’s probably more I haven’t found yet. These have been built up over the years and offer an impressive arsenal of sounds. Unlike Cakewalk who seem to hang onto aged versions of old content they are all great looking, updated to reflect the new interface and just as cool as they’ve always been. You’ve got more going on in here than in Reason. There’s a few that are a little light on content and cheekily direct you to the website to buy sounds. And there’s a bunch of other stuff under the “Generators” label that I just don’t quite grasp yet from internal patching to envelope shaping and the dancing pixie. But pulling up the plug-in picker displays such a dazzling array of sonic possibilities you can’t help but smile.
VST Support
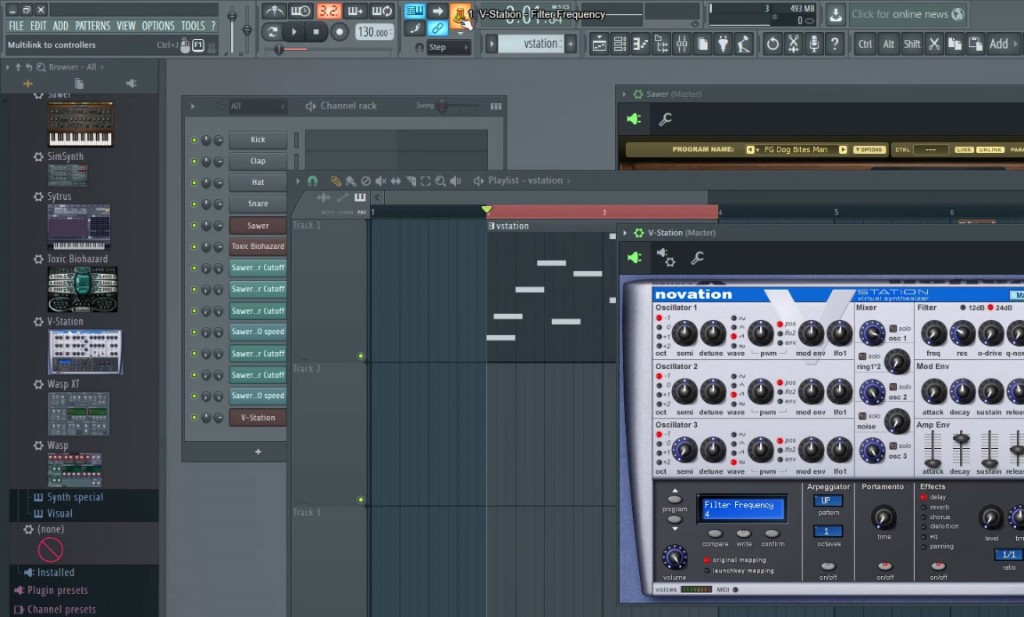
This is now completely integrated and works by using it’s own wrapper. This allows you to use all the same functionality with VST synths as you can with their own synths. I’ll load up Novation V-Station as an example. Again you just drag and drop it in although you can only find them in the browser at the side initially, but once loaded you can save the plug-in as a favourite under one of FL’s categories. This then grabs a thumbnail and stuffs it into the Plugin Picker making it even more awesome. You then create patterns as normal and slap them into the Playlist. Automation requires just one more step than the included synths because right-clicking VST instrument controls does different things that don’t include the “Create Automation Clip” option. There’s a magic knob up in the toolbar and it’s this that connects MIDI control to MIDI parameters. Click the knob so it lights up, move the parameter you wish to control and then move the controller with which you wish to control it. In other words, click magic knob, move Filter Resonance knob on V-Station and then move my keyboards Mod wheel and you’re controlling it. You do the same with automation clips. Click magic knob, move the parameter but then right-click the magic knob and select “Create Automation Clip” and you have tied that parameter to the clip. So setting up automation and setting up external controllers is remarkably simple.
If you’re using multi-timbral instruments such as Kontakt where you need to access different sounds on different MIDI channels then FL has, of course, a couple of ways to handle it. The simplest way is using note colours in the Piano Roll. This is a cool idea where you have notes of one colour on one MIDI channel and can then add more notes of other colours covering all 16 channels. Cool but probably really busy to work with – although for doubling up on some sounds it could be awesome. The alternative is to use the “MIDI Out” plug-in which allows you to take a MIDI input and route it to any MIDI output. So you load one up in the Channel Rack and direct it to Kontakt on channel 1, add another for channel 2 etc and then create patterns in their piano roll rather than Kontakts. This is probably the first time that the standard DAW way of doing things – having physical tracks assigned to things – seems better than what FL does but this does work perfectly well.
The Mixer
It’s at times like these when you’ve got a scattering of synths, patterns all over the place, automation flying, multi-timbral synths playing, that thoughts start to turn to mixing. Previous versions of FL Studio have suffered from having, well, a really crap mixer. It was probably really functional – like all of FL is – but seemed to be very much a utility rather than the creative centre for balancing and processing of sound – it was also pitifully small. Version 12 changes all that. Naturally it doesn’t work quite like anyone else’s mixer – what would be the fun in that?
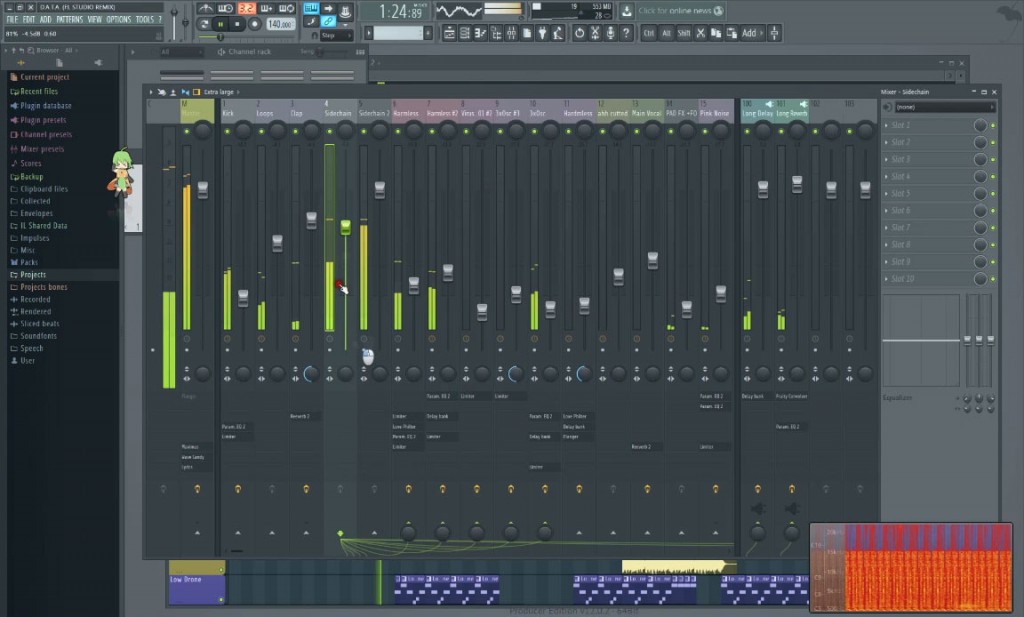
The mixer is now a squeezing and expanding console of faders that has lots of different sized layouts, the “Wide 3” seems the most comfortable to me. Load up a bunch of synths and the mixer remains unmoved – nothing changes, it’s all a peaceful oasis of greyness. Get some patterns playing and the only metering you get is the master output. As there are no fixed tracks there’s no automatic feed from tracks to channel strip. Instead you have to allocate your synth to a mixer channel manually – they all default to go straight to the master channel. Of course there’s a couple of ways to do this. From the synths editor menu choose “Assign free mixer track” and it will appear in the next available slot on the mixer – or hit the spanner icon and assign it as the “Track” number. Or in the mixer itself right-click a channel and go to Channel Routing – “Route selected channels to this track”. In either cases the shortcut is “Ctrl L” and the mixer names the channel to the synth and off you go. There’s lots of room for confusion here as the naming conventions get a bit dodgy. Mixer channels seem to be labelled as “Inserts” and yet they are called “Tracks”. Things in the Channel Rack are called channels so I guess you can’t also have mixer channels, although maybe you should. Personally I don’t see why when you load a synth it can’t automatically assign itself a mixer channel/track thingy. There’s also a little weirdness where if you select one mixer track and hit Ctrl L it gets named like the synth you just assigned – super – but if I select another channel and do the same thing the assignment moves but now both mixer tracks are named the same thing, although only one actually has the routing. None of these things are major hurdles but it does show how difficult it is to try to evolve something into a piece of studio software that’s come along an entirely different route.
The mixer itself is simple but versatile. At the top you have a choice between metering or a wave display, a single mute/solo button, pan and then a very long fader. You then have some unexpected things like swapping left/right channels, changing polarity and stereo separation. Next you have effects slots on/off (or “inserts” in regular software) and this refers to a bank of inserts and EQ over on the right of the mixer. You appear to get 10 effects slots for plug-ins plus a 3 band EQ. If you change to the “Extra Large” mixer view all the inserts (sorry, “effects slots”) appear at the bottom of the channel so it’s way easier to see where everything is. At the bottom we have record enable, a handy plug-in delay compensation on/off button and routing. The routing is kind of groovy and interesting. With your channel selected simply click on the routing button on any other track and it gets a nice virtual wire connection – you can build up quite a bank with one sound, each with 10 effects slots. You can also select and create groups or create busses and route channels to it. Groups create these little separators to highlight where it is and you can actually add these manually to help you organise your mixer which is pretty cool. The mixer has dockable sides, a bit like Sonar’s console. On the right is some send channels and on the left you have the Master output – but you can whop any channel you like over to those docks so that they are always visible. You also have a huge meter over next to the master channel which shows the current selected channels level.
The mixer is very touchable, but I’ll come onto that in a bit.
The only disappointment to me is that lack of colour. You get a little hint of colour at the top of the strip which mirrors the colour of the thing in the Channel Rack but I’d really like this to bleed through the whole channel – it would push away some of the greyness and just make it a more pleasing environment. Compared to the previous version the FL Studio 12 mixer has leaped light-years ahead!
Audio Recording
I get the feeling that recording audio is not FL’s favourite thing. It likes dealing with samples and dragging those into clips but live recording is a slightly different matter. But before we get into that it’s worth mentioning what FL called “Disk Recording” which I guess is a Fruity Loopism for bouncing or track mixdowns. If you record enable a mixer channel and then go to the mixers menu you’ll find “Disk Recording” and “Render to wave file”. This enables you to render any channel or selection of channels into an audio file which then appears as a clip in the Playlist – this can be a pattern or a selection in the song. You could of course use this to essentially freeze synth tracks…. But it’s not really the same thing as other DAW’s where you have systems in place that automatically unload the synth and can also reload the whole thing back up for you. As a track rendering tool it’s pretty cool though.
So let’s record some guitar.
The effect list on the right of the mixer is also the home of audio inputs and outputs for audio recording. So each channel can have a separate audio input and output allocated here. As soon as you select the input you’re plugged into it becomes live and monitors automatically – there’s no button or obvious way to turn monitoring on or off but a quick delve into the manual reveals that you have to unhook the mixer track from the Master – you essentially kill the routing which seems a bit ham-fisted.
FX Plugins – clicking on the effects slot brings up a massive list of included plug-ins, neatly organised into categories. Perhaps it would be more fun to click on the Plug-in Picker and look at them that way. I don’t know if this was a casual idea or something they worked hard at but to view all the plug-ins as thumbnails like this is simply lovely. It really does help you choose the right one. You can either view them all or filter them into separate categories. You’ve got controllers, reverb, dynamics, distortion, filter, flanger, gain, patching – where you can link a load of effects together and visual plug-ins including a WinAmp style visualisation plug-in. There’s some really great stuff in here, the “Soundgoodizer” single knob warmer, the “EQUO” graphic EQ and the “Gross Beat” repeater are particularly satisfying. There’s some dated stuff from way back that perhaps is a bit less polished but you have a brilliant selection of sound altering tools at your disposal. For guitar there’s “Hardcore” which is a half decent pedal board It does sound a bit weak when compared to Amplitube or Guitar Rig but is not too bad when put up against included guitar amps/effects in other DAWs.
Once you have your inputs and monitoring setup you are ready to record audio. Now there are two ways to record audio – you can record directly into an audio editor/sampler plug-in called Edison or you can record into an audio clip in the Playlist. Which method is best really depends on what you’re trying to achieve and I confess that I find this all a bit confusing.
Let’s do some regular recording like normal people into a song laid out in the Playlist. Hit the record button and choose “Audio, into the playlist as an audio clip” from the friendly menu. The song plays back and you record alongside. There’s no real indication that recording is taking place other than the red record button – nothing appears in the Playlist until you press stop. That’s a bit annoying because I like to be able to “see” that something is being recorded, and also check that it’s not clipping as I go – those sort of visual displays of waveform materialising on the track are very comforting. FL requires your total confidence that it’s doing what it says it’s doing.
Ok good – pretty straightforward but perhaps not as much as you’d think as anomalies start to creep in. Because it’s an audio clip and not a track the recorded clip doesn’t have a mixer track, it’s going straight to the master – so you have to open its properties and choose a mixer track or use Ctrl L to assign it to the first empty one. If you had effects inserted – like you probably would when recording guitar – then those effects would have been recorded as well because the audio is routed to disk at the bottom of the inserts, not the top. If you were clever enough to avoid that by setting up some routing so that your recording track is routed to an empty track which has the effects in it then you’ll have a nice dry recording but one which isn’t routed to its effects on playback. You’d have to go back and do some re-routing all of which feels a bit messy to me. One cool by-product of this freeform, no track way of doing things is that you can keep on using the same mixer track for all your recordings. So I lay down a rhythm guitar track, press stop, press record and I’m recording a lead guitar alongside without having to do anything else – that’s pretty cool – but is it cool enough to cancel out the annoyance of having to mess around with routing and effects? Not sure.
Recording into the Playlist gives you the ability to do multichannel recording and also break free from the tempo restrictions and loopiness of FL – you can just record a band or orchestra without any patterns or other stuff going on, but it’s not FL’s forte.
Let’s get to grips with the Edison then.
It’s editing abilities and way of working is very much what you’d find in a hardware sampler. It works as a plug-in that you drop into any effects slot at the point (so pre or post other effects) that you wish to record. The audio is recorded into Edison, and into RAM like a sampler rather than to disk, and so it will playback from Edison in the same mixer track that you recorded on and will go through any effects loaded in slots after it. So you’re essentially sampling rather than recording to disk. Edison has a whole bunch of sort of old school audio editing tools – normalise, fade, EQ, reverb, timestretch, noise removal, auto-slicing – all the stuff you need to deal with samples. You can also load existing samples straight in and manipulate them and have them play from Edison like a loaded instrument – although not a played from a keyboard type instrument, you’d need to dump it into the “Sampler” plug-in to do that – but you can trigger different regions over MIDI – although I can find no way to sequence that. Right this has already got over complicated – there’s far too much in Edison to do it justice in this review so here’s what’s basic and cool about Edison – loop recording.
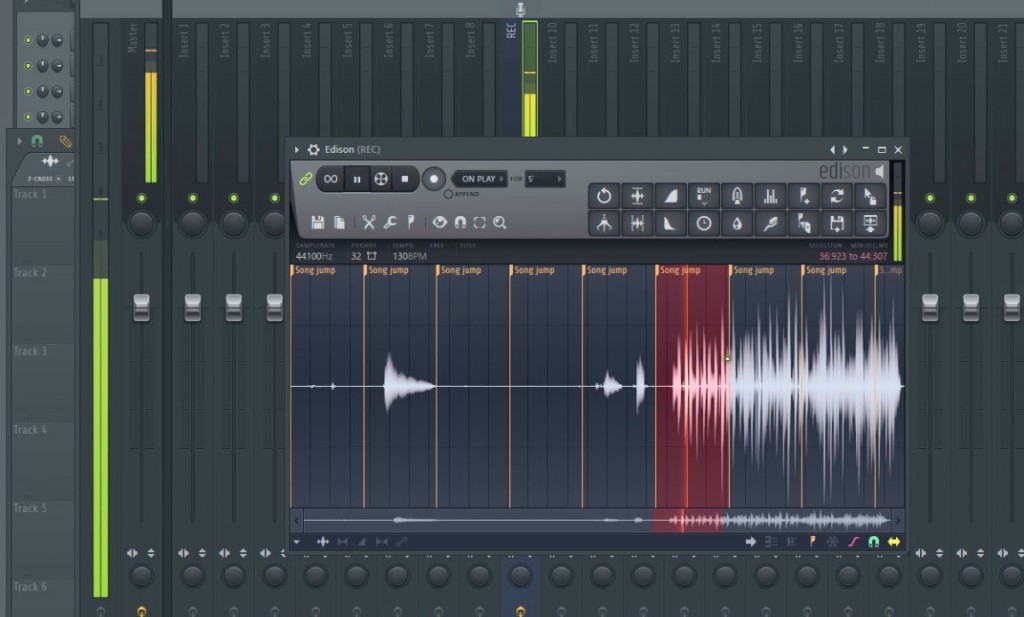
I’ve set up a 4 bar loop in the Playlist in order to recording some guitar alongside. We’ve setup our mixer track for recording and this time we opt for the “Audio, into the Edison…” option when we press record. This automatically inserts the Edison into the track and abruptly sets you off recording. Edison, unlike recording into a clip, shows you recording as you go in one long stream but marks each loop point as a region. So you just keep on recording, keep playing until you’ve done a loops worth that you’re happy with. Now you can leave the selected section playing from within Edison but there’s also an awesome button that lets you drag the selection straight onto the Playlist as an audio clip – and probably you can pull in as many versions as you like. That, to me at least, is the cool stuff but there’s a lot more in there.
That is the gist of things in FL Studio 12, but before I pull it all together into some kind of fruitless summary let’s have a look at its touchableness.
No wait! Performance mode!
Performance Mode
This uses the Playlist to individually trigger audio clips – a bit like Ableton Live, and a bit like Stagelight and Matrix mode in Sonar. The setup is that you can play any clip but only one clip per track. You can set up markers that will launch all the clips at one point in time – like scenes in Ableton Live. Each clip can be a single shot or looped or a load of other stuff involving motion which dictates if and how it moves to the next clip on the track. One important unique feature of FL is that automation is also a clip and so you can essentially create a whole load of effects clips which enable and apply plug-ins to the playing audio – pretty cool. The best way to demonstrate this is to And if you check out my Fruity Loops improvisation you’ll see how you throw one together. And of course the best way to play is with a touch screen which brings us to this….load up a demo performance song and mess around.
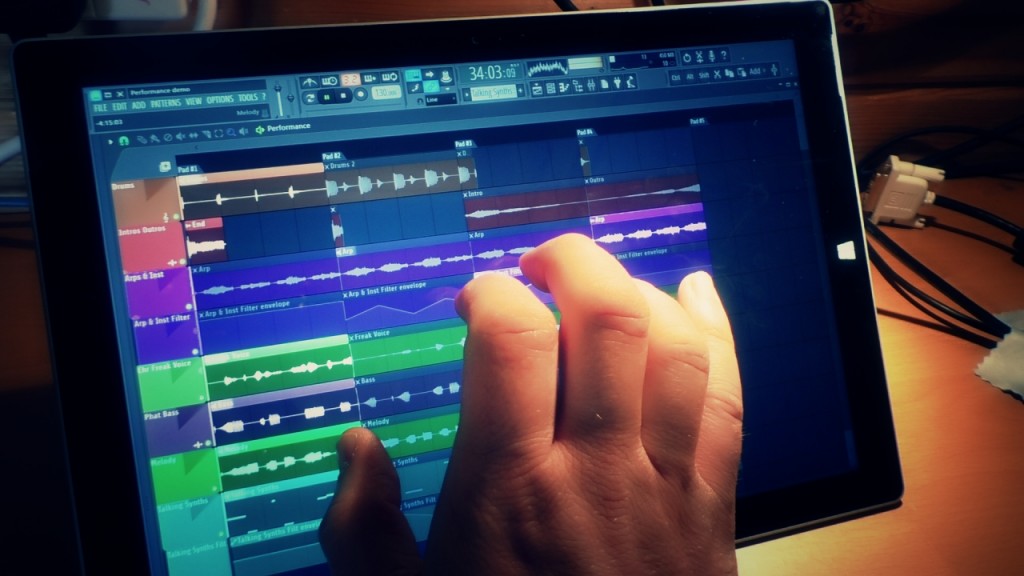
If you check out my Fruity Loops improvisation on the YouTube channel you’ll see how you throw one together. And of course the best way to play is with a touch screen which brings us to this….
Multi-Touch
FL Studio 12 has made some noise about their multi-touch support and it’s great to see this finally being implemented somewhere interesting. It’s worth checking out the video I did on this….
In all the important places FL is awesome for touch. The general controls, toolbars and browser are all of a decent size and very fingerable. There’s even a new toolbar expressly for dealing with those missing keyboard shortcuts I’m always banging on about that has Ctrl, Alt and Shift toggles, Copy/Paste, an “Add” button for patterns etc and a huge volume knob. That to me speaks volumes of how they’ve approached the touch interface – they’ve actually worked on it and used it on tablets and seen what needs to be done to make it effective. I just wish you could orient it vertically down the side – but then I’m never completely happy.
In the Piano Roll and Playlist you get some nice two finger gesture control over zooming and scrolling. Pinch in any direction to zoom horizontally in the timeline. To zoom vertically you do this sort of dialling motion where you plant your thumb and rotate your first finger around it. To scroll you put on two or more fingers and drag in either orientation. This then leaves a single finger for editing. Using the Pen tool you have to double tap to enter a note or add a clip and double tap to delete. Moving to the Paint tool gives you single tap adding which is probably the better option. Editing velocity stalks and automation clips is an absolute breeze. The only issues really are that some of the tool icons are a little small – could there be an option just to double them in size? And there are lots of regular size mousey menus that can get tedious to navigate with a finger. They seem to have given this some thought too because when you select notes in the piano roll with your finger an edit menu pops up automatically with useful commands on it. This doesn’t happen with the mouse.
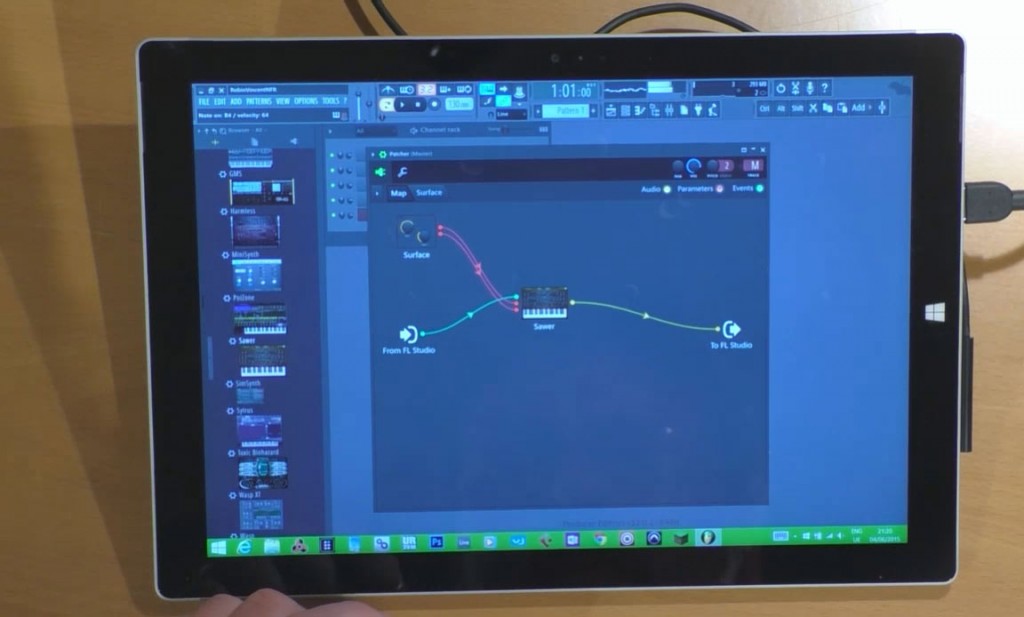
After I thought I’d finished this review I started work on Presonus Studio One 3 which has some interesting multi-touch features in their new “Multi-Instrument” plug-in. The more I looked the more I liked until I realised that the Patcher in FL Studio is exactly the same thing. Patching synths and effects together is nothing new – Reason and Ableton Live allow you to create similar chains – but what sets the Patcher (and Studio One) apart is that you can create a top level control surface for the some of the parameters of the synths underneath – and it’s multi-touch. The reality of this is that you could take a non-touch synth like say Massive from NI and create a multi-touch control surface for it. And it’s dead easy to do. Drag and drop whatever synths and effects you want into the Patcher, click on “Surface” and add a bunch of knobs, click back on map and drag virtual wires from the controls to the synth you want to control and select the parameter from the list – dead easy! I am quite blown away by that. But there’s more – it occurs to me that it would make an awesome standalone plug-in for other host programs assuming it could retain its touchability. Well of course Image Line have already thought of that and FL appears as a VST plug-in where you can route MIDI in and audio out with your host such as Cubase or Ableton Live. The plug-in launches the full FL interface and you can load up a patcher and create your multi-instrument with a multi-touch wrapper. That works brilliantly but you have all the other FL baggage knocking around – what I’d like to see is the interface stripped down to just the patcher and the synths – that would be a wonderful thing. And that’s what FL call their Minihost Modular plug-in – it’s free and is essentially the Patcher as either a standalone VST host or a plug-in. One thing is currently lacks is the multi-touch “Surface” – if they can get that working then the Minihost Modular would be a killer touch screen app. As it is it’s so good it’s bonkers.
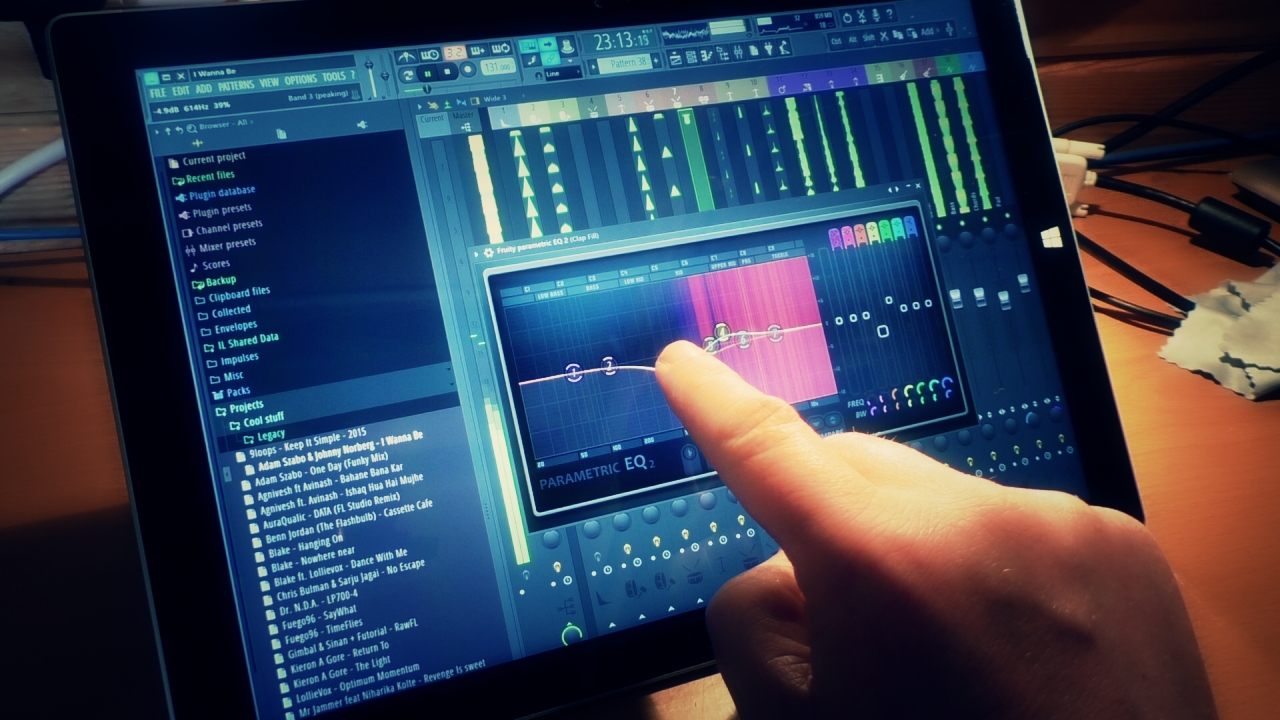
Back to other touchy parts. The mixer has two touch modes would you believe – of course you would, this is FL Studio 12! The first is like a single touch mode where you can navigate the mixer, scroll left and right with the same two finger gestures, and use a double finger tap (that’s a single tap with two fingers) to add channels to the selection. Then the second mode enables multi-touch mixing on the faders so that you can get all your fingers in there mixing to your hearts content. This extends to the pan and stereo knob on the channel but does not include the effects slots or EQ. With the wide or Extra-Large view the mixer becomes totally usable as a multi-touch console.
The way the windows move, resize and zoom is so beautifully smooth and effortless with fingers. The whole move to vector graphics and the attention they’ve paid to how to make it work with touch in both the mixer and the Playlist and editing areas put Cakewalk and Presonus to shame.
Lastly performance mode comes fully alive with touch – it’s hard work trying to use a mouse with that. A MIDI pad controller would also do the job but touch is a whole lot easier. If you’re a Fruity user on a desktop then you need to get yourself a touch screen – if you’re mobile then your next laptop has to be the Surface – nuff said.
Summing Up
Well, what a journey. As a total FL Studio virgin I felt I had to dig as deep as I could to pull out the coolest and most interesting features. As FL tends to do everything slightly differently that meant I had to talk about some pretty basic stuff – but I hope that’s been helpful to you. There’s also untold depth and exciting things like extracting Piano Roll patterns from audio, or stamping, strumming and arppegiating that there’s simply no time to go into, but everything has at least one menu of other stuff worth exploring.
There’s no doubt that FL is focused on pattern and loop based music and whenever I start turning my nose up about such things – because I’m sensitive and freeform, man – I remind myself that actually all my music is in patterns, grooves and loops and FL makes the generation of these things so much easier than any other DAW. The vector interface is slick and smooth and lovely – but the colour scheme still gets me down, particularly in the mixer where I get grey-blind and sometimes find it difficult to know what I’m doing – some colour would help with that. The way that FL incorporates dozens of different ways of working is one of its strengths but it can also make the interface feel messy and inconsistent. The naming conventions can be a bit annoying to someone coming from a pro audio background, but, you know, Fruity Loops does it’s own thing. The workflow of the drag and drop interface, the plugin picker and the painting of patterns is enormously efficient and easy to use.
If the blank page of most DAWs leaves you a bit cold and intimidated then I would recommend looking into FL Studio 12 as it’s so easy to start making and manipulating music. It comes with a huge sound palette and a way of working that’s a lot of fun while being able to produce perfectly professional results. If your focus is audio then this is probably not for you but for the electronic musician, songwriter, experimental producer or live performer then you really should give it some of your time and see what happens.
8 thoughts on “Image Line FL Studio 12 – Full Review”
Thanks for that in depth review, Robin. I appreciate the time and detail you put into your reviews, excellent read.
I was in the same boat regarding FL Studio thinking it’s just an updated Fruity Loops. However your review convinced me to check it out and even I’ve just scratched the surface I have to say I’m quite impressed. I honestly think Image Line are doing some very basic things right to generate interest:
– Provide a full demo without useless limitations or requirements (are you listening, Steinberg?)
– Sell it for a reasonable price
– No dongle
– Lifetime upgrades
– Scale your UI the way it’s meant to be in 2015
– Multitouch
– Provide a good support and FAQ section
– Selectable UI layouts for Desktop or Tablet
Nothing to add to your review really. I’ve just spent a few days but it seems full featured and very capable. A small problem for me is that it’s not able to sync FL Studio to external MIDI clock. But there should be a workaround. And that damn right click behaviour…
It seems like they read your review about the great grey sea:
FL Studio 12.1 Beta release notes:
-Full colorization of mixer tracks (and other visual enhancements)
– […]
😉
I have been using this program since version 3.3! I love it and find it easy to understand. I never had any problem with the “grey” but you seemed to have a
ball making fun of it. I’d like to think the music is more important.
I hate the ugly attitude many musicians have had towards this software for ages.
Sure maybe it’s original name didn’t do it any favors, but for many reasons (many unfounded) people have always been snobs about it. I’m sorry that FL Studio doesn’t cost $1000 and only run on Macs.
And just once in awhile (as I will show you with my song here) people can make some half decent music with it.
https://soundcloud.com/synapticflow/night-life-7
Good review. I will say this though. I bought a HP 17.3″ laptop with an I7-6700hq and GTX 950 for 900 dollars. Having a larger display makes touch screen interface easier to read and operate. My system has intel realsense which I hope someday that we will be able to use motion gestures in front of the camera as a midi controller. Technology just keeps getting better and it is great the FL Studio is up to date using this touch technology before anyone else has really tried to make it work.
Image Line says that 4, 5 or even 8K monitors can be used with pin-sharp fidelity. The preferences now let you control interface scaling, and while even 4K monitors might still be relatively rare, this is definitely a foundation that’s been laid for a future in which they will be more common.
Nice post bro you are a great writer this is a great software and 100% working
FL Studio 12
Thanks for interesting article. I am using FL 12 for a long time
and it is pretty cool.
Samples and loops using from them : https://www.lucidsamples.com