Windows 10 is upon us so I thought it would be good form to be sensible and attempt to backup my Surface Pro 3 before I let Microsoft completely overwrite the system. What I’m talking about here is not data backup – like saving photos to the cloud or syncing folders – I’m talking about creating a system image backup of your entire system drive so that if something goes terribly wrong you can put your entire system back onto the Surface and continue where you left off before all this upgrade nonsense.
Why it’s called a system “image” I’ve no idea and it’s an unhelpful term that we all continue to use, but it does help to separate the process from the regular data backups.
There are a number of ways of doing this and it usually involves a third party piece of software of which there are plenty. Windows also has the ability to do its own system image backup but I’ve found these less than ideal because they seem to only work well when the drive that’s being restored is the original drive and completely intact – they seem less good in an emergency when your drive has failed and you’ve had to replace it. At least that’s been my experience. So for the purpose of this article I’m going to concentrate on a free third party solution that I am fully confident will do the job. The software in question is Paragon Backup and Recovery 14 Free Edition which you can download from here:
https://www.paragon-software.com/home/br-free/
I don’t find this software particularly intuitive – there seems to be a gazillion options and choices which I’m sure are all very helpful but tend to be a bit bewildering – so I’m going to guide you through the simplest method and ignore all the complexity.
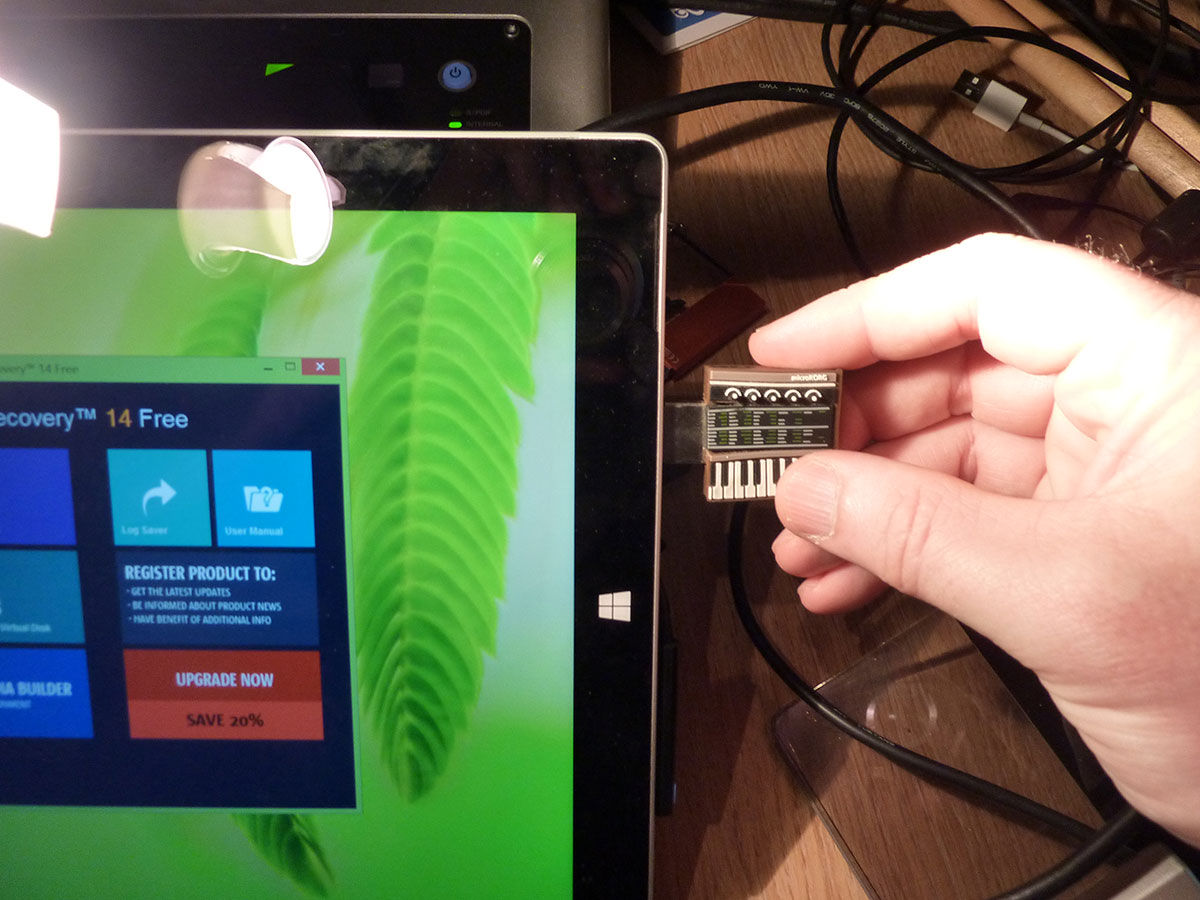
The Surface doesn’t have all the usual things you’d use for system backups – CD drive, second drive, multiple USB ports, so we’re going to need a bit of a plan. First we’ll need a USB thumb drive to boot into the backup software and then we’ll need a larger external USB drive to backup to. You can backup over a network but you’ll need to inject network adapter drivers into the recovery media and be able to setup a network share – if that’s your bag then go do that thing but as there’s no driver disks for the Surface then that might get problematic – so I’m going to stick with the external USB drive option. USB drives are inexpensive and very handy. I use one for storing all the sample and instrument library from the various VST instruments I have installed on the Surface and I’m going to use that drive to store the backup.
But before we begin we should take the opportunity to do a bit of house keeping and make our Windows install as small as possible. If you are anything like me then your Surface will be packed full of files and programs – all of them vital of course – but the more space you’ve used the larger the backup image will be and longer it will take. So you want to be moving your files off the system first – photos, videos, project files and music – back them up onto something else and delete them from your Surface. Then uninstall anything you don’t actually use. Hopefully your system drive will have released a bit of space. Another tip is to reduce the size of the swap file and disable hibernation to prevent these temporary files from being part of the backup. These are regular Windows tweaks that you might have already applied:
Bring up System Properties, click on the Advanced Tab and under Performance click the Settings button. Click the Advanced tab and under virtual memory click on “Change”. Select “Custom Size” and set it to 4096 for each and click “Set”. This makes Windows set a fixed swap file of just 4GB. Left to its own devices it tends to set it to 2 or 3 times the physical memory which could mean 16-32GB of wasted drive space – and if you have 8GB’s of memory there’s really no need for such a large swap file.
To turn off Hibernation which can tie up a similar amount of disk space right-click on the Windows button and select “Command Prompt (Admin)” and then in the Command box type “powercfg.exe /hibernate off” (without quotes) and press Enter. Nothing much appears to happen but after a reboot you should find that you have a lot more free space and smaller Windows installation – nice one!
Once you are happy that you have a sensible system we are ready to run Paragon.
Build the Recovery Media
You can create a backup from within Windows but it’s better to do it from recovery media as that’s what you’ll use if your system fails. So stick in your USB thumb drive and select “Recovery Media Builder” from the splash screen.
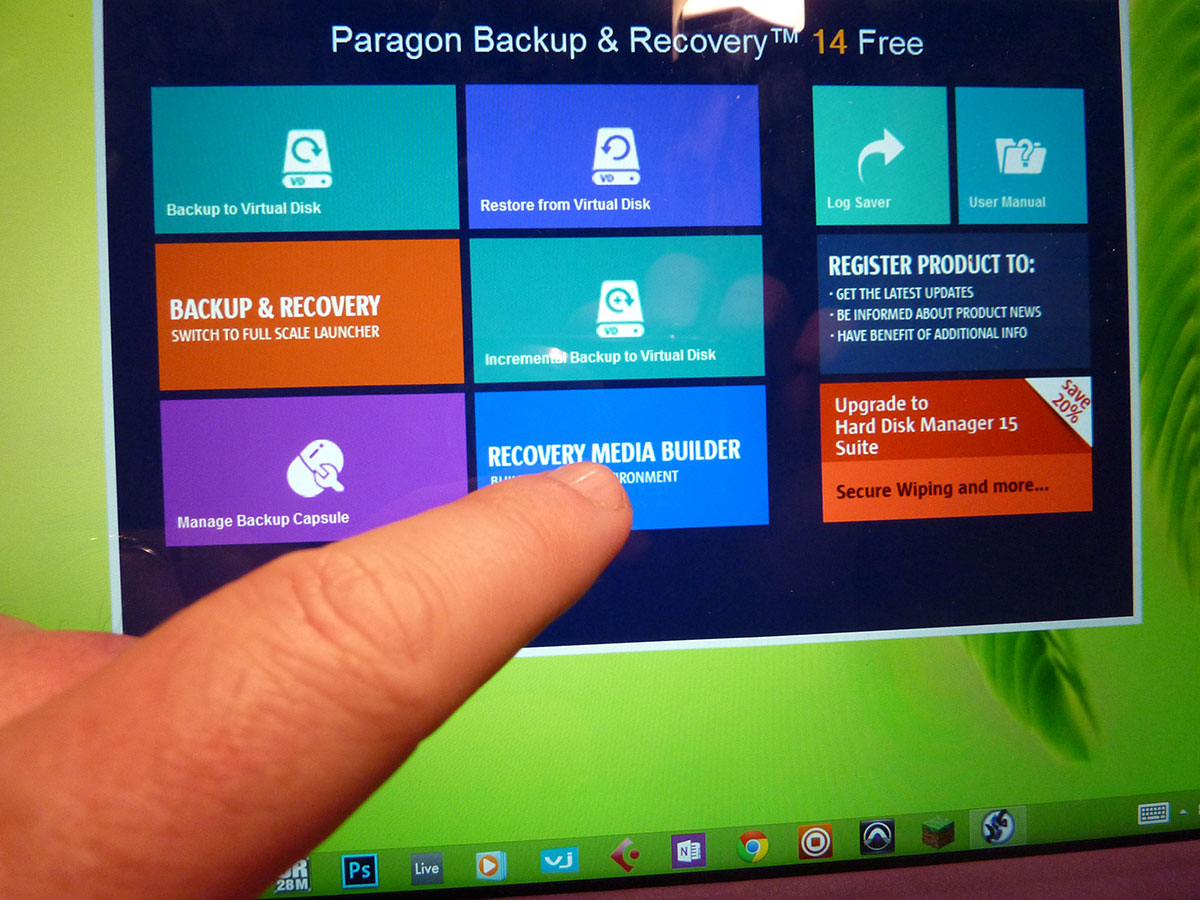
Then do as follows:
- Select Advanced mode.
- Select Microsoft Windows PE
- Select your thumb drive and say yes when it asks if you’re sure.
- Don’t add any drivers.
- Skip the network.
- Don’t mount a share.
Wait a good few minutes while it formats the thumb drive and creates the recovery media.
Booting from the USB Thumb Drive
It’s at this point that you realise that you’ve never seen the BIOS or boot options for the Surface come up like they do when you boot any other computer. Windows 8 has a way of specifying the USB device as the boot device as follows:
- Tap the Windows key and type “Recovery Options” and select it from the list
- Under Advanced Options tap “Restart Now”
- Tap Use a Device.
- Tap USB Drive.
The Surface will now boot from the Thumb drive and into Paragon Backup and Recovery. But we don’t want to do that – no no – because if your system gets screwed you may not be able to get into the OS to perform this useful action. So instead we’ll have to get ourselves into the BIOS and persuade the Surface to boot from USB.
To enter the BIOS:
- With the Surface off.
- Press and hold the volume up button on the left hand side
- Press and release the power button
- When the word “Surface” appears release the volume button.
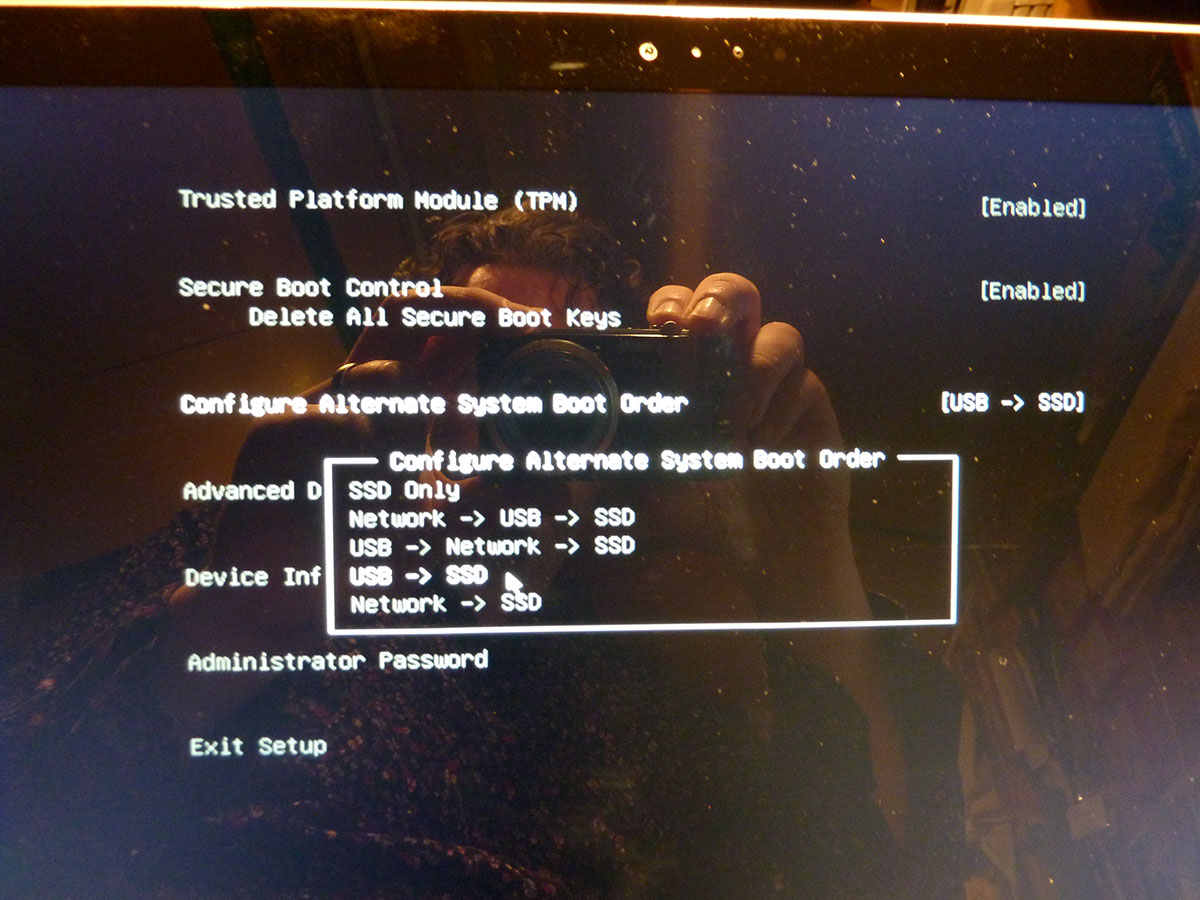
Tada! You are in the Surfaces BIOS. Two things we need to do. Firstly go to “Configure Alternate System Boot Order” and select “USB -> SSD” from the list. Second go to Advanced Device Security and set “Side USB” to Enabled. Click Exit Setup and opt for Save and Exit and the Surface will reboot and boot into the recovery environment from the USB Thumb drive. Hooray! If it complains about the lack of network just ignore it.
One Last Road Block – Bitlocker
Now we know how to boot from the Thumb drive there’s one last thing we need to do in Windows – and that’s to turn off the Bitlocker encryption on the C drive. If we don’t then Paragon will ignore the system drive and the only thing we’ll back up is the original recovery partition – which is no good at all. So remove the Thumb drive, reboot into Windows and press the Windows key and type Bitlocker and select “Manage Bitlocker”. Tap on “Suspend protection” and tap “Yes”. Bitlocker is now off until you reboot which will allow Paragon to backup the drive. All too easy(!).
Quick note – if you are using a Surface 3 (non-Pro) then Bitlocker is called “Device Encryption” which you can also disable, although you can’t just suspend it.
Backup To A Virtual Disk
Right, stick the Thumb Drive back in, reboot and get us back to the Paragon screen.
Once to the main screen you can remove the Thumb Drive and plug in the larger external USB drive that we’ll be putting the backup onto. You have to do the drive swap before you press any other buttons or it won’t be seen.
Then when you’re ready do as follows:
- Tap “Backup to Virtual Disk”
- Give it a minute to initialise and tap Next
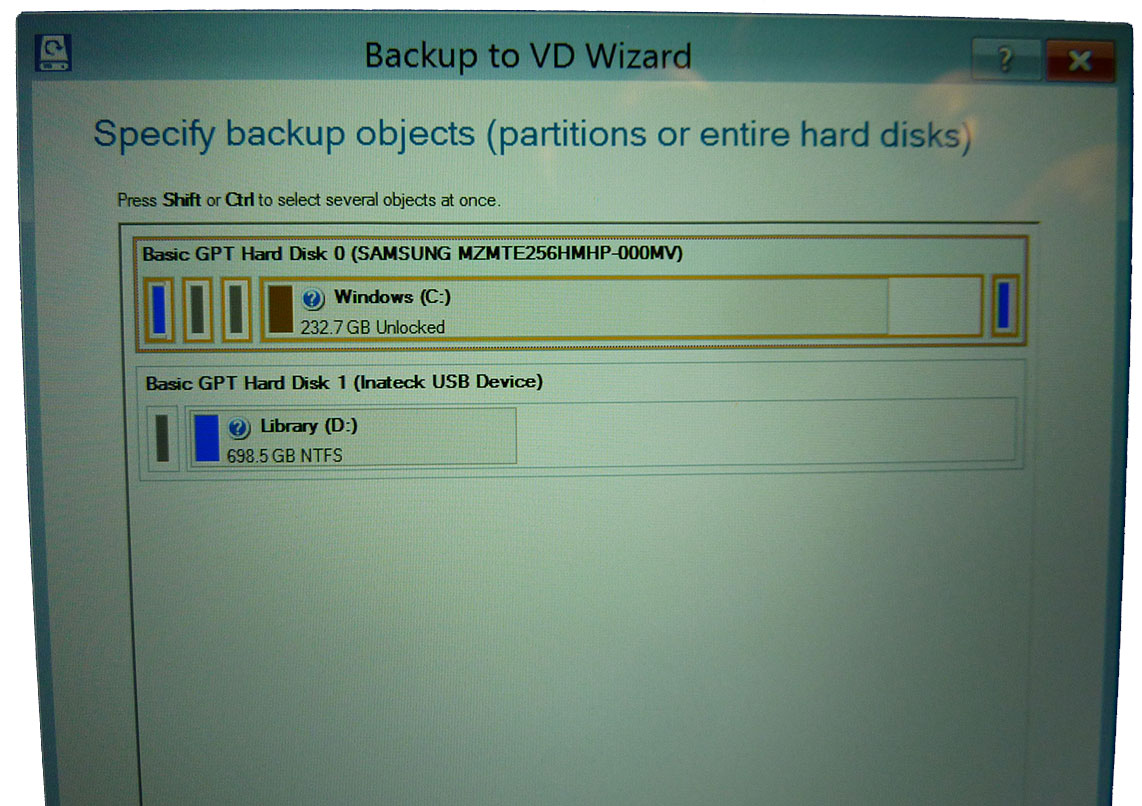
- Now you want to select the whole hard disk by clicking or tapping on “Basic GPT Hard Disk 0”. This should select all 5 partitions, each one in an orange box including the one labelled “Windows (C:)”. It should say it’s “unlocked” if not you’ll have to go back into Windows and suspend the Bitlocker as above. With all the partitions selected click Next.
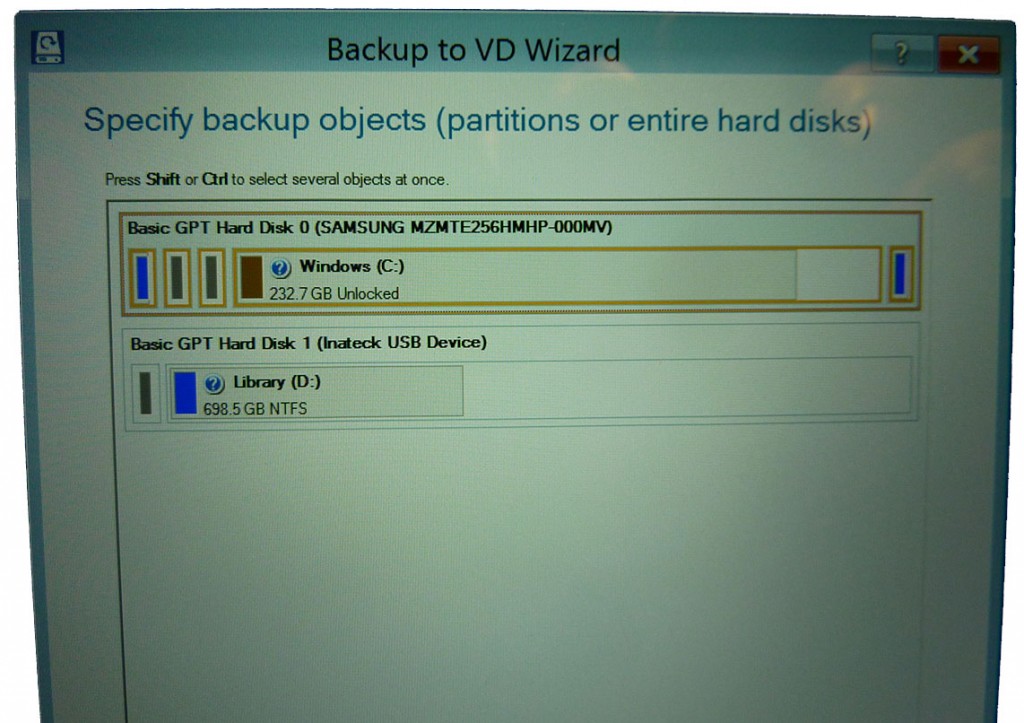
Make sure the whole drive is selected - Click the folder next to “Backup destination”
- Select your external USB drive and click OK
- Call it something helpful and click Next.
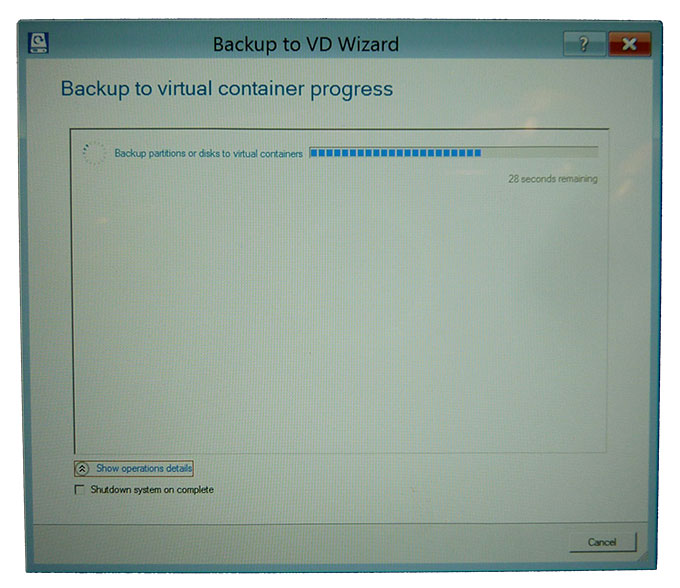
- The backup will start preparing and you may get a message about Raw processing needed – this is because Paragon doesn’t fully recognise one of the Surfaces utility partitions and needs to spend more time on it – this is fine, say Yes.
- And it’s off!
It will indicate that only a handful of seconds are remaining to complete the backup and it will keep on saying this for however many hours the backup will actually take – it gets fooled by those smaller partitions.
That’s it – you may want to leave it running overnight depending on the size of your system. When it’s done you’ll want to put the backup away safely on a shelf somewhere and ideally make another copy to another drive and put that somewhere else.
In the event of disaster you boot again from your Thumb drive and follow the wizard to Restore from Virtual Disk – but we’re not going to worry about that just now as it’s not going to happen…. Probably. The important thing is that you’ve done it, you’ve made the backup – hurrah!
I hope that’s helpful and if I were you I’d also do a Windows system image to an external drive. You can access it via the Control Panel – File History and click “System Image Backup” in the bottom left. That’s belt and braces.
7 thoughts on “How to Backup a Surface Pro 3”
very helpful, thanks!
Hello Robin,
I was wondering if you have tested actually restoring from the image you have created? Another question, I’ve read in other posts on creating images for SP3s
That destination USB media should be formatted Fat32,. Is that nessesary or does
Paragons “Recovery Media Builder” handle nessesary formatting.
I’m a newby to this and find it all a little intimidating.
Thanks for your help in advance.
Hi Tim,
I haven’t restored my SP3 no, but I have restored plenty of other machines using Paragon and the process I described. The recovery media builder does everything you need it to – you don’t have to concern yourself with the formatting, and certainly the destination for the backup should not be FAT32 or it won’t be able to hold the size of files we’re talking about. Backup to a regular drive, nothing special needs to happen.
Cheers
Robin
Hi Robin,
Thanks so much for your quick response and instruction.
One more question, Should I turn hibernation back on after
completion of process? If so would the command be “powercfg.exe /hibernate on”?
Thanks again, Best Regards, Tim
I assume that would be the command but hibernation is, to me at least, a pointless waste of drive space, so personally i’d leave it off.
Hi,
I recently took a knock on my bike on the way to work, and my surface pro 3 was damaged in the process. Luckily the LCD still works, so ill be able to get most files off of my system, but I was wondering if this process would aid me in restoring an image to the replacement Microsoft is sending to me.
Am I trying to create an image of the drive that way? I just have too much time invested into the Surface, ill have to re-install programs, and a whole slew of customizations, I wanna save time.
Yes, that could work – it’s worth a try anyway 🙂